Saturday 21 January 2012

2011 Retrospective: The Picnic Quilt

I wasn't blogging in 2011 so I am taking the liberty of sharing some of my previous projects.

Insanely, I undertook my biggest project of 2011 when Treacle was only four weeks old. I really wanted to make my best friend a very personal wedding present and had a jelly roll I really liked stashed away so even though I knew I really didn't have the time, I decided to go ahead and try my hand at a quilt. All of this was only possible because S showed his love for my friend and her new husband by taking care of the kids and chores while I worked on their present!


I have made baby quilts before but knew I didn't have time for a double-bed size or anything intricate so I went for a picnic size quilt using easy-to-assemble blocks. I used the Pandora's Box pattern in Jelly Roll Quilts by Pam Lintott and Nicky Lintott. The pattern dictates five blocks by eight blocks so to make it more picnic sized, and accomodate the fact that my jelly roll was a little smaller than the pattern expects, I made it just five blocks square. The final quilt size is around 52 inches square.


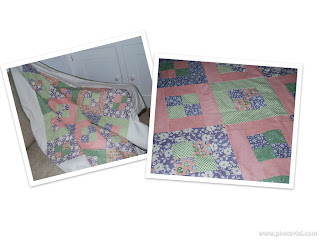
I picked up the jelly roll in Masons some time ago and unfortunately I have no recollection of the design or manufacturer! I backed the quilt with a solid salmon pink to match, and made binding from a coordinating green. 

My cutting wasn't great so I sought advice on squaring up my blocks before joining them together. I went with the freezer paper method. It did produce a much more "square" quilt top than I would otherwise have been left with but it took so much effort to remove the paper I don't think I'll be doing it again in a hurry. Accuracy with my cutting and stitching would be a better solution!

Again, due to lack of time and experience I decided not to stitch this quilt and opted to tie instead. This involved taping the backing fabric to the floor, layering on the wadding and the quilt top and pinning the layers together with safety pins. Once the pins were in place I used cream embroidery thread to make small single stitches that I knotted off. I spaced the stitches well apart. I was quite relieved when that was done and I could sit at my sewing machine to attach the binding to the front and then collapse on the sofa to hand finish the binding on the back.


Sunday 15 January 2012

Pirate Party

A couple of months before Poppet was born I went to ante-natal classes run by the NCT where I made some lovely friends. Poppet and the children of these friends all turned three during December 2011 so we've been doing a fair amount of party-going recently! One of these parties gave us our first experience of a themed children's party and Helen did an amazing job creating a Pirate Party.

Pirate hat decorating. Pin the eyepatch on the pirate. Fairy cake decorating. Find the treasure chest. And of course... dressing up as a Pirate!


Poppet happens to own a navy striped top from H&M, a pair of skinny jeans, and her Daddy volunteered his spotty handkerchief (yes, he has been made aware that he's the only man under 50 that actually owns and uses handkerchiefs and that they are in fact unhygenic, but I digress).

So all we had to make was a Pirate vest and an eye patch. Of course, the sewing blogosphere didn't let us down. Both items were made from the fabulous tutorials on MADE. The frontier vest was constructed from black felt and red ready-made bias binding and the eyepatch from black felt and thin black elastic. I am terrible at machine sewing bias binding - I never catch both sides - so was grateful this is for dress up only! The skull and crossbones patch came from a pack I found in our local Oxfam but you can currently get them online from the Oxfam shop (currently half price!).


Saturday 14 January 2012

The Oliver + S Bear Carrier

We gave our last Christmas gift to a lovely little friend today and she put it on right away and wore it for an hour!

The bear carrier we gave was made with pink wool and a pink patterned quilting cotton lining. I added a little touch by adding an applique heart to the pocket. It did look very cute carrying a pink bear.

Poppet's Bear Carrier (Oliver + S)


The carrier pictured is the one I made for Poppet (my 3 year old daughter) as a Christmas gift. This one was made with an embroidered babycord and a purple quiting cotton lining. Sadly, this carrier wasn't enthusiastically received because Poppet can't put it on by herself, and being the impatient independent type, toys that need adult help get short shrift at the moment.

The carrier is from Oliver + S Little Things To Sew and fits children from age 2 upwards.  The pattern says for ages 3-8 but our little friend is a small two year old and it worked fine. Fat quarters are sufficient for the outer body of the carrier and the lining but the straps take a significant amount more. You'll need fabric 10 inches by 42 inches. The carrier is fastened using buttons and velcro.


I was inspired to make the carrier having read gail @ probably actually rave about it (and I was fortunate to be able to borrow the book from my Mum but she'd lost half the patterns so had to buy a new copy, blah blah...). I would agree that it looks adorable but it did highlight my inexperience in sewing curves. To avoid a mess I didn't top stitch and I think this lets the end result down a little. More significant is that the velcro I used isn't sticky enough so the poor bear hangs sideways after a while. If I change the velcro and help Poppet practice with the cross-over straps, it may still be a hit!

Oliver + S Bear Carrier Tips:
  • Practice sewing curves before you start
  • Use very sticky velcro
  • Be aware that children will need assistance putting the carrier on due to the cross-over straps
  • Pocket is easy to customise

Finding the time...

...is hard to do. But, inspired by the bloggers I've been following recently (see the list on the right), I've decided to try. Finding the time to sew is difficult so I can't imagine where I'm going to get the time to blog about it too! However, I find myself wanting share things that have worked (and some things that haven't) and tell people that might care about my sewing thrills and crises. I've also got some patterns that I would like to make available and this seems to be the way the global sewing community does it. So, I'm in!